> ## Documentation Index
> Fetch the complete documentation index at: https://docs.ipmideck.com/llms.txt
> Use this file to discover all available pages before exploring further.
# Dell iDRAC
> 在 Dell iDRAC(iDRAC6 / iDRAC7 / iDRAC8 / iDRAC9)上启用 IPMI-over-LAN,以便 ipmideck 能连接到你的 PowerEdge 服务器。
**适用于:** Dell iDRAC6、iDRAC7、iDRAC8、iDRAC9(PowerEdge 服务器)。下面的
截图来自 iDRAC6;iDRAC7 和 iDRAC8 几乎相同,而 iDRAC9 将
相同的设置重新组织到 *iDRAC Settings → Connectivity → Network* 下(见末尾的备注)。
Dell iDRAC 在 ipmideck 中**已支持 / 已测试**。这些步骤来自 Dell 官方
文档和一台真实的 iDRAC6,请在依赖之前确认导航路径与你的 iDRAC 固件
匹配。
## 步骤
在浏览器中,导航到 iDRAC IP 地址(出厂默认 `192.168.0.120`)并
登录。PowerEdge 默认凭据为 **root** / **calvin**,如果它们仍在
使用中,请立即更改。
 在左侧窗格中选择 **iDRAC Settings**,然后打开 **Network/Security** 选项卡及其
**Network** 子选项卡。此页面包含 IPv4 设置,再往下是
**IPMI Settings**。
在 **iDRAC9** 上,等效路径是 **iDRAC Settings → Connectivity → Network**。
滚动到 **IPMI Settings** 部分并勾选 **Enable IPMI Over LAN**。将
**Channel Privilege Level Limit** 设为 **Administrator**(或至少 Operator),以便
ipmideck 能读取传感器并控制电源。
在左侧窗格中选择 **iDRAC Settings**,然后打开 **Network/Security** 选项卡及其
**Network** 子选项卡。此页面包含 IPv4 设置,再往下是
**IPMI Settings**。
在 **iDRAC9** 上,等效路径是 **iDRAC Settings → Connectivity → Network**。
滚动到 **IPMI Settings** 部分并勾选 **Enable IPMI Over LAN**。将
**Channel Privilege Level Limit** 设为 **Administrator**(或至少 Operator),以便
ipmideck 能读取传感器并控制电源。
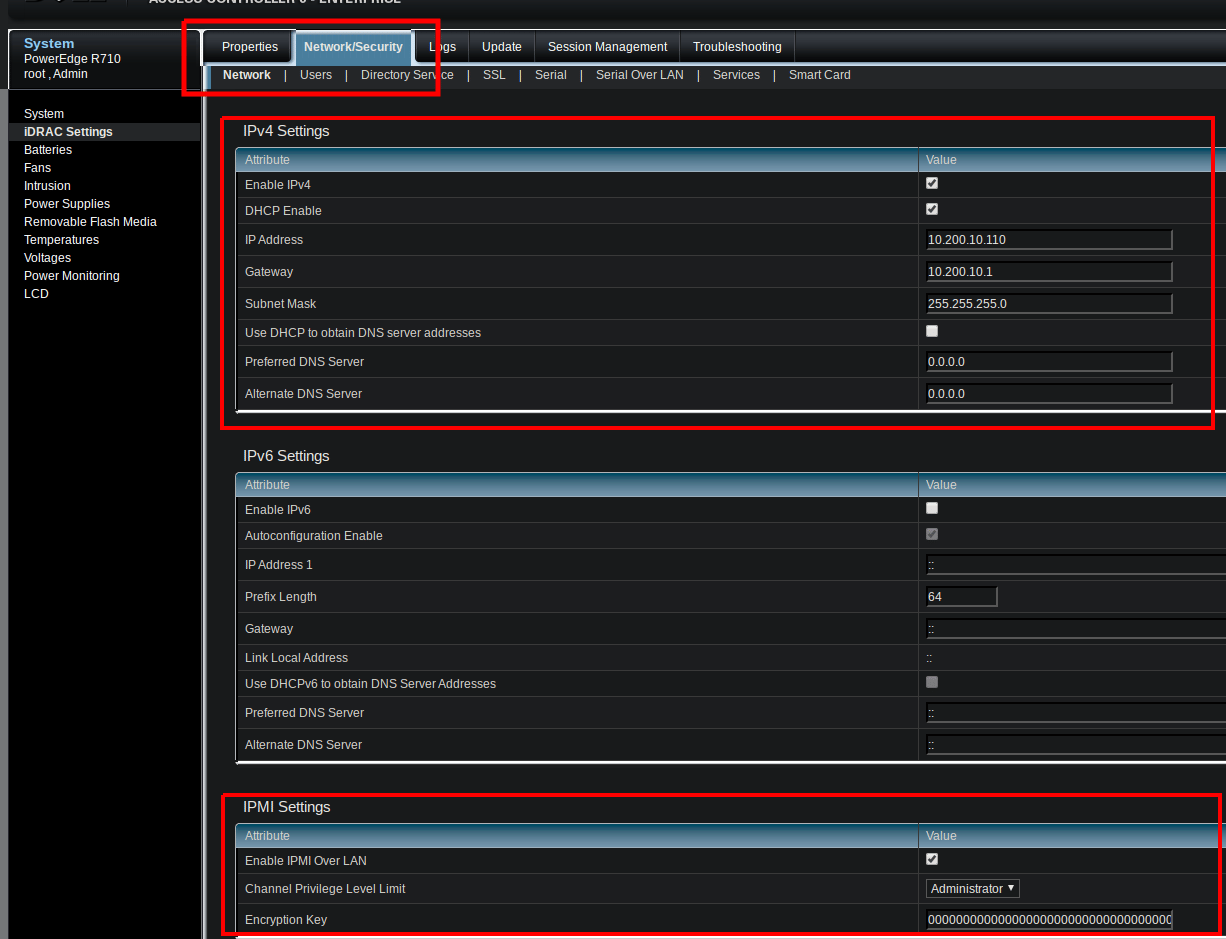 对于标准的 `lanplus` 会话,**Encryption Key** 可以保持全零(默认)。
仅在你的安全策略要求时才设置一个 40 字符的十六进制密钥。
点击 **Apply** 保存更改。
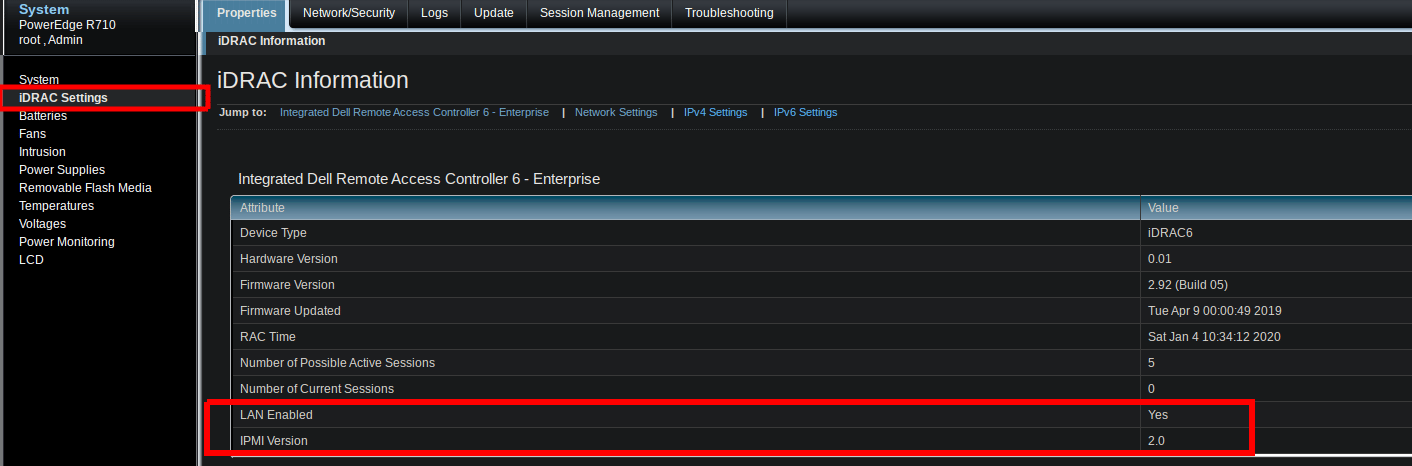
回到 **Properties → iDRAC Settings → iDRAC Information**,确认 **LAN Enabled: Yes**
和 **IPMI Version: 2.0**。
对于标准的 `lanplus` 会话,**Encryption Key** 可以保持全零(默认)。
仅在你的安全策略要求时才设置一个 40 字符的十六进制密钥。
点击 **Apply** 保存更改。
回到 **Properties → iDRAC Settings → iDRAC Information**,确认 **LAN Enabled: Yes**
和 **IPMI Version: 2.0**。
 然后,从将运行 ipmideck 的主机,确认 LAN 通道有响应:
```bash theme={null}
ipmitool -I lanplus -H -U root -P calvin chassis status
```
**路径因代际而异:** iDRAC6 / iDRAC7 / iDRAC8 使用 *Network/Security → Network →
IPMI Settings*(如上所示),而 iDRAC9 使用 *iDRAC Settings → Connectivity → Network*。
请针对你的硬件验证确切路径。
## 来源
[CITED: dell.com/support/manuals, iDRAC9 User Guide, section "Configuring IPMI over LAN using web interface"](https://www.dell.com/support/manuals/en-us/idrac9-lifecycle-controller-v3.1-series/idrac_3.15.15.15_ug/configuring-ipmi-over-lan-using-web-interface)
然后,从将运行 ipmideck 的主机,确认 LAN 通道有响应:
```bash theme={null}
ipmitool -I lanplus -H -U root -P calvin chassis status
```
**路径因代际而异:** iDRAC6 / iDRAC7 / iDRAC8 使用 *Network/Security → Network →
IPMI Settings*(如上所示),而 iDRAC9 使用 *iDRAC Settings → Connectivity → Network*。
请针对你的硬件验证确切路径。
## 来源
[CITED: dell.com/support/manuals, iDRAC9 User Guide, section "Configuring IPMI over LAN using web interface"](https://www.dell.com/support/manuals/en-us/idrac9-lifecycle-controller-v3.1-series/idrac_3.15.15.15_ug/configuring-ipmi-over-lan-using-web-interface)